The winds are whipping around outside my window. Although we planned to go surfing in Santa Cruz today, the rain and wind are making our surf outing look grim.
I decided to help my son work on his new game, Swarm. Wow, surfing or Python programming... Well, he's a typical teenage boy, he'd rather go surfing. But, we can't control the weather, so he's stuck with Pygame.
The concept of Swarm is to have a player face increasingly larger waves of swarming zombies. It's a classic game with the ability to move and shoot in four directions. The game is designed to work on his LG Optimus S Android phone with a screen size of 480x320.
The left thumb controls movement. The right thumb controls firing. There are unlimited bullets in the current version. He takes a great deal of satisfaction is blasting through 20 zombies.
This is the first time we've used transparency. For the controls, we learned that the transparency can be handled with Gimp. In the layers window, there is a slider bar for Opacity. For other surface objects, we're using the set_alpha method of the Surface class.
The grass and trees are made from 32x32 pixel tiles. They're not set in a map right now. My son is planning the game to involve going through a series of rooms. He doesn't need to put the tiles into a map right now.
The swarm algorithm for the zombies to chase the player is pretty basic. We're simply tracking the position of the player and move the zombies 1 pixel toward the player in both the x and y axis for every frame. The frame rate is currently set to 30 frames per second.
The trickier bit was how to handle the zombie crowding problem. We've got it set now to simply check for zombies colliding with each other using pygame.sprite.spritecollideany.
Python endures the test of time. After a few years and dozens of classes, I'm still teaching my teenage student exclusively Python.
If you decide to teach your child to program, there are many choices. Teaching children to program is trendy and popular, at least in my town of Palo Alto. I've met other parents that use Scratch, Alice, Java, and JavaScript. I've never met a parent that focused on Python for teaching. You probably won't use Python. You'll probably teach your child Java or JavaScript. I stick to Python. Why?
Well, my student is making significant progress both for desktop and mobile applications. If it works, don't break it.
The article below was written by Marshall Brain. It made me think again about why I don't move to Java or JavaScript. The two hottest areas for kids are mobile and JavaScript development. Since my student is interested in focusing more time on mobile development, it seems natural to use Java for Android or a some type of hybrid JavaScript-native platform like Appcelerator Titanium. I resist and continue on with Python, using the aging Pygame SDL layer, and Pygame Subset for Android.
I persevere with Python partially because we started with Python, but also because I'm trying to avoid distractions. My goal is not to teach my student to write a game. The goal of my lessons is to get just a tiny bit deeper on a few basic concepts around data structures and inheritance.
Instead of covering a wide swath of technology, I'm trying to focus in on a few concepts at a time. In the next few months, I hope to focus my student on data structures such as the list data type, more on dictionaries, possibly through the use of JSON data for tile maps. I'm also planning to cover python classes in more details.
Let's say that you have children, and you would like to help them learn computer programming at a youngish age. As the father of four kids, I have tried to approach it from several different angles. What I would like to do here is collect some ideas for parents who are looking for different options.
Let's start with a something important: Every kid is different. Some kids are reading and writing fluently years ahead of other kids. For them, learning to program is probably easier. Some kids have the basic analytical skills a lot earlier than others (Here's a story about a 9-year-old writing full-blown iPhone apps). And so on. You try to expose your kids to programming and it may or may not "take" the first time, simply because of these differences. So you wait a few months and try again, or you might try a different approach. Understand that, the first time you try to introduce your kids to programming, your kids might not "get it" at all. And that's OK.
The second thing to realize is that real analytical skills often don't start appearing until age 11 or 12 or 13 in many kids, so expecting huge breakthroughs prior to that may be unrealistic.
That being said, there are lots of fun things you can try as early as five or six...
Games
Let's start with a few games. Here are three games that my kids have particularly enjoyed. They teach basic problem solving ideas in different ways:
If you look around on the web you can find lots of "problem solving" games like these three.
Then there is this game, which actually does a very good job of teaching simple programming skills:
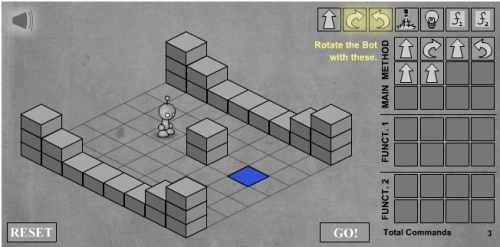
Light Bot (the "Play" button is on the bottom right, under the ad, after it loads)
I love Light Bot. It will engage kids for a couple of hours, starting at age 7 or 8. Some of the puzzles in LightBot are too hard for kids. There are walkthroughs on YouTube that help.
Or jump into Google. There is lots of stuff about LOGO on the Web.
Bigger efforts
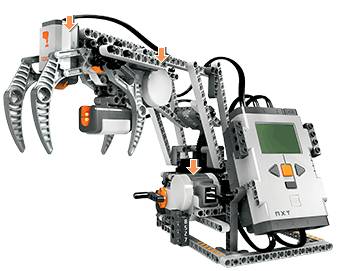
One thing that one of my kids enjoyed quite a bit is Lego Mindstorms. This is a Lego robotics kit. I've seen kids as young as six or seven doing meaningful programs with it. It uses a graphical language that is pretty simple to understand. If you don't mind blowing $200, then it is definitely worth a look. If you find that your kid really likes it, you might also look into FIRST Lego League (FLL teams build Mindstorms robots, work on presentations, etc.). One of my kids has been on an FLL team for several years and it has been great for him.
The good thing about Mindstorms is that it lets kids build some interesting stuff. The problem is that, after a month or two, you may find that you have come to the limits of what it can do. [Yes, there are adults on YouTube showing off some amazing, advanced stuff, but I suspect that these people are geniuses.]
A friend recommended this educational system for programming robot simulations. It is free:
Another big effort like this is Phrogram, formerly known as Kids Programming Language. KPL had the huge advantage that it was free and pretty amazing. It came with dozens of sample programs and could do both simple and complex things (for example, a really good pinball machine was one of the samples). But for some reason they killed KPL off and morphed it into Phrogram. Phrogram is $50, and I haven't tried it, but assuming that it is a similar package it might be worth it.
On these pages, a father talks about his efforts to teach programming to his daughter using a tool called Greenfoot:
GameMaker is a pretty sophisticated tool with a lot of options. There are tutorials to help you get started. I would not use this as a "first foray" perhaps, but it is something to consider for a second foray.
Also there is a free eBook on creating games with Python which states, "written to be understandable by kids as young as 10 to 12 years old, although it is great for anyone of any age who has never programmed before":
The tagline is: "Codecademy is the easiest way to learn how to code. It's interactive, fun, and you can do it with your friends."
Real programming - Stanford's Java Class
My son (around age 13) started using Stanford's free online Java class and he has gotten a lot out of it. The class includes YouTube lectures and class assignmentsthat reinforce the concepts discussed in class. The programming environment used in the class is called Eclipse. Eclipse is a full-featured development tool with a great debugger and it is free too. This is the class my son took:
Our son needed a little encouragement from his parents (i.e. deadlines) to get through the first assignments, but by the time be got to Programming Assignment #4 (writing the code for the game called "Breakout") he was completely engaged and extended that basic game in a number of directions without any prompting from us. I feel like this class taught him the essence of being a "real" programmer.
Stanford has many classes to explore - click for list. Their offerings represent a valuable resource for anyone wanting to learn programming.
Once comfortable with Java, something like this might be interesting to try - a combination of Greenfoot and Java:
Real programming - C and C++ Programming
The C and C++ programming languages are two of the most widely used programming languages in the world. There are free compilers that are readily available and lots of tutorial information can be found for free. Here are two resources that can help get you started:
Google is your friend and can help you find tons of other stuff.
Learning to write iPhone and iPad apps
Writing apps for the iPhone and iPad is not for newbies, but it is definitely something that middle school and high school students can master if they have a knack for programming. And the audience for these apps is gigantic through the App Store that Apple operates. Here are the steps that you need to take if you want to get started:
Step 1 - Step 1 is to buy a Mac computer from Apple so that you can compile apps. The cheapest entry point is a Mac Mini at $600. A MacBook Pro is a laptop that costs about twice as much.
Step 2 - Once you own a Mac, go to the Mac App Store and download XCode. It is free. This package contains the development environment, the compiler, SDK and libraries, and a simulator so you can test your apps on simulated iPhones and iPads.
Step 3 - Apple offers a series of introductory tutorials:
Step 5 - Once you develop your first app then it is time for Your First App Store Submission - You have to pay $99 to join the Apple Developers Program to take this step.
Google can help you to answer nearly any question or problem you run into as you are learning.
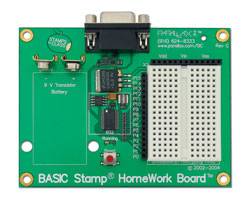
The BASIC Stamp
I have actually had a good bit of luck engaging my 10-year-old in programming using a device called a BASIC Stamp. So I would like to spend a little time here talking about it. It is not cheap, but it has three things going for it:
It combines programming and simple electronics
The programming tends to be very simple
You can do real things with it, or at least things that seem realer (to my kids anyway) than Mindstorms.
We were first introduced to the BASIC Stamp when we found this kit at Radio Shack for $90:
The big caveat is that you need to have a computer with a serial port to use it. If you do not have such a computer (most computers made since 2005 don't have a serial port), then you need the USB version of the kit for $160:
So, already, you can see that the BASIC Stamp is not simple or cheap. We've already had to worry about port types and which kit to get. And if that puts you off, so be it.
But we did buy the kit at Radio Shack, and we did have an older machine with a serial port, and we did get it set up and it did all work and... here is what was amazing about it. My kid could sit down with the book, by himself, and on his own he could wire up little circuits and write little pieces of code and get it all working. The programs and the electronics are easy enough that a 10-year-old can manage it. This is admittedly simple stuff, like wiring up a push button and having it make an LED blink, or making a servo motor turn or making sounds come out of a speaker. But the idea that my kid (who hates reading for the most part) could get this stuff working was impressive. And then he could think of extensions on his own. Trivial extensions, yes, like making two LEDs blink, but extensions.
The nice thing about this approach is that you can buy other pieces at Parallax.comand they are pretty easy to hook up. One of the first things we bought was a PIR module ($10), which is the kind of thing you use in a burglar alarm or an automatic light to sense a warm human body. We also bought a little text LCD panel ($25). And he built a device that could count people as they walked by. If you have a family of six people, how many times do they use the stairs in the house? How many times do they open the refrigerator? With this device you can find out. (The refrigerator was funny - it was opened something like 50 times a day!)
Next thing was a ultrasonic sensor ($30). With that and the LCD display you can build a little ultrasonic tape measure. They have a lot of little sensors like this that you can try. We've used the accelerometer, the thermometer, the RFID tag reader, etc.
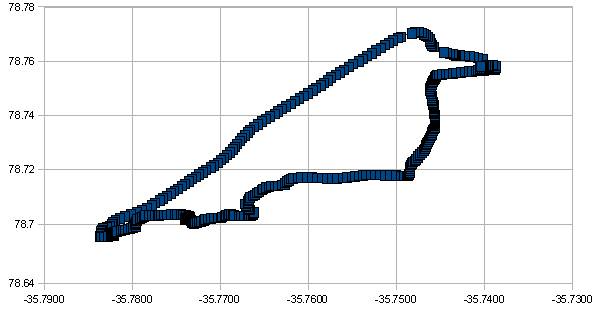
His latest adventure is with the GPS module ($90) and the USB memory stick reader/writer ($35), which he used in a science fair project. With the USB memory stick thing, you can plug in a USB memory stick (AKA "thumb drive") and read and write files. So you can create a text file and start dumping in data. Then you can hook up the GPS, let it gather data and save the data into the memory stick. With that you can create bread crumb trails everywhere you go. You can then plug the memory stick into your laptop's USB port, load the data into a spreadsheet and do a scatter graph...
...or you can drop the data into Google maps as described here:
As it turns out, the Parallax GPS is not the greatest. When we first hooked it up, it would never get a lock on the satellites. After an hour of probing on Google, we found out that you have to mount the GPS about 10 inches away from the Stamp (because of electrical noise generated by the Stamp). It would have been wonderful if this fact had been revealed in the Parallax documentation. But even after you do that, this device can have trouble getting a lock sometimes (ours doesn't work at all in rainy weather, for example). It does work in the car if you put it on the dashboard, but not from the interior. [All of these problems eventually led us to a site called Sparkfun.com, which has a much better selection of GPS modules that are slightly less easy to use.]
It also led us looking for material on the web about the BASIC Stamp. There is a lot of it. For example, there are people building autopilots from BASIC Stamps:
You can find all kinds of stuff like that. Then you discover that there are many other platforms more advanced than the Stamp, like for example the Arduino, theTeensy, the Microchip PICkit (see also this book and this book), the Gumstix, etc.
Conclusion
The point is, if you want to introduce your kids to programming, there are MANY different ways to do it. If you want to go down this road, Google is your friend. It is amazing how much stuff is out there. Just start looking, try different things with your kids, and see what works for you. It can be a lot of fun.
The Pipo Smart S1 is a 7" Android 4.1 tablet that costs under $100. It works great and is quite fast. It's comparable to the Nexus 7" at half the price. I changed the firmware to rev3 with instructions from TopNotchTablets. This download also got rid of the apps that had Chinese language, giving a more comfortable user experience.
The CPU is a Rockwell RK3066 1.6GHz chip.
Rooting the tablet and upgrading the firmware was fast and painless.
Getting the tablet to work with the Android Debug Bridge (adb) was trickier.
Pygame Subset for Android (PGS4A) relies on adb that is included in the platform-tools sub-directory of the Android SDK.
When I first connected the Pipo Smart S1 tablet to my Ubuntu box with a micro USB cable, the build worked, but the install failed.
After figuring out how to use adb, I started to use adbdevices to see the connected devices. It wasn't detecting the tablet.
I found out that adb needs a USB Vendor ID to work properly. Pipo wasn't listed as a vendor. I found that the Vendor ID for the RK3066 chip is 0x2207.
Here's a screenshot of the game running on the Pipo Smart S1, transferred using a USB cable with adb.
After I got this working, I worked with my son, my only computer programming student, to get a similar game working on his LG Optimus S phone. The main learning points today:
using .append to fill a list of objects. The list target_group contains all the enemies and all the bombs.
Set up triggers based on elapsed time use list slicing to control the number of targets on the screen.
After I wrote the blog post, I also found this on slatedroid.com. It covers many of the same steps. I'm not sure if shutting off WiFi is needed. The person below also seems to have adb working without having to run the adb server as root. I may fiddle around with more things in the future. The main thing is that I can connect my tablet to adb in debug mode and install the apk files easily.
Posted 21 November 2012 - 08:31 PM
Just a few tips to those are trying to connect to a RK3066 via ADB on linux.
I've been trying to figure out the best way to set up timers in games. Timers are used all the time, for example, the firing rate of a gun, the delay in a joystick button press to check to see how many times the button was pressed, or the speed of an animation.
The overall speed of the game is controlled by a clock that is usually used to control the frame rate. For example,
clock = pygame.time.Clock() framerate = 60
In the main game loop, the clock is ticked.
clock.tick(framerate)
To control time for individual objects, I usually use the standard python time module.
## using the standard python time library, not a pygame module.
## 10 millisecond delay if elapsed_time > 10: ## do the action we've been waiting for.
I notice that many people using the pygame.time module in their games. I've tried to figure out the advantage of this and I can't understand it out. The people using this module are usually better programmers than I am.
## using the pygame.time module, not the standard python time library. current_time = pygame.time.get_ticks() ## example 10 millsecond delayif next_update_time < current_time: # do stuff next_update_time = current_time + 10
Finally, I notice that other people are using the main game clock, the one that is usually set to 50 fps or 60 fps. Here's a code snippet that blits the image once every 10 frames. If the game is running at 60 frames a second, the image is blitted 6 times a second, effectively setting up a delay of over 100 ms.